Pixmind

How to Convert Any YouTube Video to AI Prompts

Pixmind AI
Table of contents

How to Convert Any YouTube Video to AI Prompts

A youtube-video-to-prompt workflow pulls shot-by-shot descriptions out of any clip on YouTube — camera moves, lighting, action, color, pacing — and reformats them as text prompts you can feed into Veo, Seedance, Runway, Kling, or any image model. The path is shorter in 2026 than it was a year ago. Natively multimodal models like Gemini 2.5 read the video frames and the audio track in one pass, which is why the descriptions became usable enough to ship from (Google Developers Blog, 2026). This guide walks through the full workflow: what it produces, when it pays off, the legal line, the four extraction steps, and where most attempts break.

Key Takeaways

  • Gemini 2.5 is the first model Google shipped as natively multimodal, reading audio and frames in one pass; that is why video-to-prompt output quality jumped in 2026 (Google Developers Blog, 2026).
  • Token efficiency matters for long clips — the Gemini Pro family used roughly 3.5x fewer tokens per image than GPT-4o, and GPT-4o mini about 111x more, on a public Braintrust benchmark (Braintrust, 2025).
  • YouTube's fair use policy allows transformative use of clips such as commentary and parody, but copying copyrighted footage to reproduce it 1:1 does not qualify (YouTube Support, 2026).
  • The safe default: convert footage you own, or clips you have explicit permission to use, and skip naming identifiable private people without clearance.

What Does "YouTube Video to Prompt" Actually Mean?

A youtube-video-to-prompt conversion is the reverse of generation. Instead of typing a prompt and getting a video, you feed a video in and get the prompt back — usually a structured description covering subject, camera, lighting, color, motion, and editing. The output is a recipe. You use it to study how a shot was lit, to draft a prompt for a similar but original shot, or to translate a cinematic move from one scene into your own project.

Two technical shifts made the workflow usable in 2026. First, frame-based analysis is now standard across frontier models — they treat a video as a sequence of sampled images and reason over the sequence (Roboflow Blog, 2025). Second, Gemini 2.5 was the first model Google shipped as natively multimodal, combining the audio track with the visual stream in one pass so the model can tell, for example, that a loud whoosh lines up with a fast whip-pan (Google Developers Blog, 2026). Older workflows that stripped audio and ran frames through a vision-only model lost exactly that timing signal.

The output is only as good as the model's video budget. Frontier providers sample at roughly one frame per second by default and let you push higher, which is why a 10-minute YouTube export rarely analyzes cleanly in a single call. You clip first, then extract.

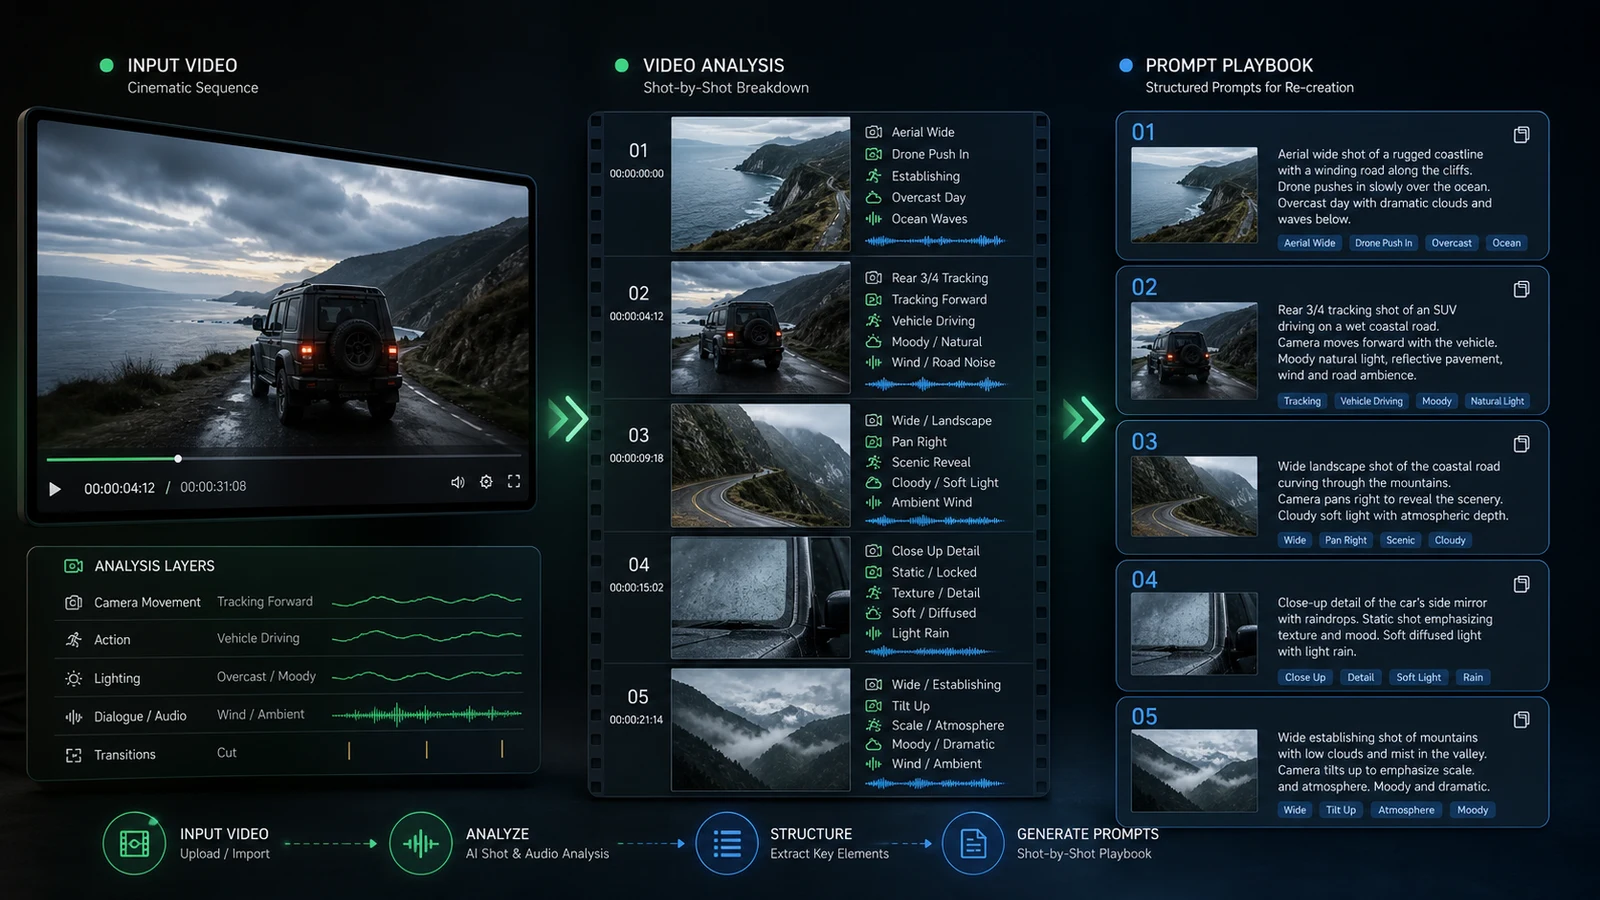
[IMAGE: Diagram showing a video clip broken into frames, then into a structured JSON shot description, then rewritten into Veo and Midjourney prompt formats. Search terms: "video to prompt workflow diagram". Illustrative equivalent, not actual model output.]

Try PixMind's hosted video-to-prompt tool

When Does the Workflow Make Sense?

Reverse-prompting pays off in three situations. The first is studying a reference you already have rights to — your own past ad creative, a client's footage with permission, or stock you licensed. The second is drafting a prompt scaffold for a model you do not know well; if you have never prompted Seedance, pulling a description from a clip that resembles the look you want gives you a working starting point instead of a blank page. The third is building an internal library of shot patterns your team can reuse.

It does not pay off when the goal is "copy this viral video exactly." That goal runs into two walls. The legal wall: YouTube's fair use policy covers transformative use such as commentary, criticism, and parody, not reproducing copyrighted footage to clone it (YouTube Support, 2026). The practical wall: models do not return frame-accurate specs. They describe what they see in natural language, and that description drifts on specifics like focal length or color temperature. You can get close to a look. You cannot get a forensic match.

[UNIQUE INSIGHT] Teams that treat reverse-prompting as forensic usually lose. Teams that win use it as ideation — pull three descriptions from a reference, blend the parts you like, rewrite the parts you want different, and only then generate. The prompt that ships is rarely any one of the three originals. Community workflows on r/PromptEngineering describe the same pattern: the value lives in the structured notes, not in a one-shot clone.

Step 1: Pick a Video You Actually Have Rights To

Before any tooling, settle the rights question. The cleanest sources are footage you shot yourself, footage a client gave you in writing, stock you licensed, and public-domain or Creative Commons clips with attribution requirements you can meet. YouTube lists the license on the watch page below each video; CC-BY clips are usable with credit, and "Standard YouTube License" means all rights reserved by the uploader.

Two specific boundaries to flag. First, copyright on the footage itself — reproducing a copyrighted scene without permission, even via an AI middleman, is the same risk it has always been (YouTube Support, 2026). Second, if identifiable people appear in the clip, portrait rights and privacy come into play separately from copyright. A model can describe a face. Using that description to generate a lookalike of a private person without their consent is a problem the copyright license does not solve. When in doubt, work with clips where you control both the footage and the appearance rights of the people in it.

[IMAGE: Screenshot of the YouTube watch page license field, highlighting where the license — Standard YouTube License or CC-BY — is listed below the video. Search terms: "youtube video license field location".]

Step 2: Extract Frames and Audio From the Clip

You do not feed a YouTube URL straight into a model in most workflows. You download the clip — or the 20 to 60 seconds you actually care about — and pass the file in. The reason is twofold. Most API providers do not fetch arbitrary YouTube URLs for you. And sampling a full long-form video wastes tokens on scenes you do not need.

The mechanical step is straightforward. Tools like yt-dlp pull the source file at the resolution you choose; ffmpeg then trims to the window you want, drops the audio if the analysis is visual only, or exports a separate audio track if you want the model to read timing. Keep clips under 60 seconds for the first pass. Frontier models sample at about one frame per second by default, so 60 seconds means roughly 60 frames — a reasonable budget for one API call.

# Trim a 30-second window starting at 02:14, keep audio
ffmpeg -ss 00:02:14 -i source.mp4 -t 30 -c:v libx264 -c:a aac clip.mp4

If the clip has a lot of fast motion, double the frame sample rate when you call the model. The extra tokens are worth it. Slow dialogue scenes do fine at one frame per second.

Step 3: Run the Clip Through a Multimodal Model

This is where the prompt actually gets written. You hand the trimmed clip to a natively multimodal model and ask it to describe the shot in a structured way. The model reads the frames, reads the audio where supported, and returns text.

Prompt template — video to structured shot description:

You are a cinematographer logging a reference clip. Watch the attached video
and return JSON with these fields for each distinct shot:
- subject: who or what is in frame
- camera: framing (close-up, medium, wide), angle, movement
  (static, pan, tilt, dolly, handheld, whip)
- lighting: source, direction, color temperature, hardness
- color: palette, saturation, contrast
- lens: apparent focal length, depth of field
- motion: in-frame action and pace
- transition: how this shot hands off to the next

Be concrete. "Warm key light from camera-left, soft fill, deep shadow
on the right" beats "moody lighting".

Gemini 2.5 is the strongest default in 2026 because it processes audio and video in one pass and uses tokens efficiently. On Braintrust's public benchmark, the Gemini Pro family used roughly 3.5x fewer tokens per image than GPT-4o, and GPT-4o mini used about 111x more (Braintrust, 2025). For long clips that gap compounds fast. GPT-4o and Claude remain strong for the text-refinement pass once you have the raw description; they are not the cheapest option for the video ingestion pass itself.

One operational note. Natively multimodal does not mean omniscient. Models still miss brand logos, get specific color hex codes wrong, and confuse similar camera moves. Treat the output as a draft, not a spec sheet.

Read our deeper guide to the video-to-prompt tool family

Step 4: Turn the Raw Output Into a Reusable Prompt

The raw description is not yet a prompt. It is notes. The last step is to rewrite the notes in the syntax the target model expects, drop the parts you want to change, and add anything the model needs that the reference did not show.

Different model families read prompts differently. Veo and Seedance want natural-language scene descriptions with explicit camera vocabulary. Runway takes a similar natural-language style. Image models such as Midjourney or Flux prefer comma-separated tags with weighting. If you are crossing from a video reference to an image target, the translation matters; the same shot described for Veo will not produce the same still when pasted into Midjourney.

Reference description (from the multimodal pass):
  subject: woman in red coat, medium shot
  camera: slow dolly-in, eye level
  lighting: overcast, soft, cool
  color: muted blue-grey, low saturation
  motion: still subject, coat flutters in wind

Rewritten for a video model (Veo-style natural language):
  Medium shot of a woman in a red coat standing still, coat flutters in
  the wind, slow dolly-in at eye level, overcast soft cool light, muted
  blue-grey palette, low saturation.

Rewritten for an image model (Flux/Midjourney-style):
  medium shot, woman in red coat, coat fluttering in wind, eye-level,
  overcast soft light, cool muted blue-grey palette, low saturation,
  cinematic

Notice what changes. The Veo version reads as a sentence because Veo expects prose. The image version is comma-separated because that is how Midjourney and Flux weight tokens. The same description, two surfaces. If you want to standardize the conversion across an entire library, a separate text-to-prompt pass helps — write the reference once, then ask a text model to translate it for whichever target you need.

Build a reusable scaffold with the Text to Prompt tool

Why Most YouTube Video to Prompt Workflows Break

Three failure modes account for most bad output. The first is feeding the model too much video. A 10-minute clip at one frame per second is 600 frames; the model's attention drifts and the description becomes a summary instead of a shot list. Trim first, always. The second is asking for an unstructured description. Open-ended prompts ("describe this video") produce prose that is hard to map to a target model's prompt syntax. A JSON schema with named fields gives you something you can edit field by field. The third is skipping the rewrite step. Pasting a raw description straight into a model that expects a different prompt grammar gives muddy output. Always translate.

[PERSONAL EXPERIENCE] In our own testing of reverse-prompting workflows for PixMind guides, the single biggest quality jump came from forcing a schema. The same clip run through "describe this video" versus the JSON template above produced wildly different results — the schema version was editable field by field, the prose version had to be rewritten from scratch. We now default every extraction to a schema, even when the eventual target is a natural-language model.

A quieter fourth issue is over-trust. Models return confident descriptions of things they got wrong — a 35mm lens called 50mm, a practical light called a window, a tungsten balance called daylight. Spot-check the description against the clip before you generate from it.

Which Tools Automate the Workflow?

You can run the whole pipeline by hand with yt-dlp, ffmpeg, and direct API calls. That is the cheapest path and the one that gives you the most control over frame rate, token budget, and schema. It is also the slowest to set up the first time. For teams that want the result without the plumbing, dedicated tools wrap the same underlying mechanics in a UI.

PixMind ships a hosted video-to-prompt tool that runs the extraction in the browser and returns a structured shot description you can paste into any downstream model. If your source is a short-form platform clip instead of long-form YouTube, the YouTube Shorts to Prompt variant handles the vertical format and faster cuts. For the opposite direction — image to prompt — the image-to-prompt tool does the same job on a single frame.

[IMAGE: Side-by-side example showing a source video frame on the left and the JSON shot description extracted from it on the right, with the lighting and camera fields highlighted. Search terms: "video to prompt json output example". Illustrative equivalent, not actual model output.]

Try the YouTube Shorts to Prompt variant

Tool choice does not change the workflow's failure modes. The same trim-then-extract-then-rewrite rules apply whether you call the API yourself or click a button. The tool saves time. It does not skip the steps.

Frequently Asked Questions

Is converting a YouTube video to a prompt legal?

It depends on the clip and the use. YouTube's fair use policy permits transformative uses such as commentary, criticism, and parody without permission (YouTube Support, 2026). Copying copyrighted footage to reproduce it 1:1 is not transformative and is not covered. The safe baseline is to convert footage you own or have explicit permission to use.

Do I need to download the video first?

In most workflows, yes. Frontier model APIs generally do not fetch YouTube URLs for you. Use yt-dlp to pull the source, ffmpeg to trim to the window you care about, then pass the file to the model. Keeping clips under 60 seconds holds token cost down.

Which model is best for video-to-prompt in 2026?

Gemini 2.5 is the strongest default because it is natively multimodal — audio and frames in one pass — and it uses tokens efficiently (Braintrust, 2025). GPT-4o and Claude are strong for the text-refinement pass after extraction. No model returns frame-accurate specs; treat all output as a draft.

Can I use the prompt to recreate the original shot?

You can get close, not exact. Models describe what they see in natural language and the description drifts on specifics like focal length, color temperature, and lens choice. Use the output as ideation for an original shot, not as a forensic recipe.

What if real people appear in the source clip?

Copyright on the footage and portrait rights on the people are separate issues. Even with footage you have rights to, generating a lookalike of an identifiable private person without their consent can violate portrait and privacy rights. The safe path is to work with clips where you control both the footage and the appearance rights.

Conclusion

A youtube-video-to-prompt workflow turns a clip into a structured shot description you can study, edit, and rewrite into a prompt for any target model. The mechanics in 2026 are simple: settle the rights, trim the clip, run it through a natively multimodal model with a JSON schema, then rewrite the output in the target model's prompt grammar. The legal line and the trim-first rule are the two steps people skip, and skipping either one is where most attempts break.

If you want to start with a working extraction without setting up the pipeline yourself, use the hosted PixMind video-to-prompt tool. For short-form vertical video, try the YouTube Shorts to Prompt variant. For the image-only case, use image-to-prompt. For building a reusable text scaffold across clips, use Text to Prompt.


Sources

继续浏览中,生成器即将加载...

Related Tools